Hi Crafty Friends!
I don't know about you but it is time for three of my favorite things. Fall, planners, and PUMPKIN SPICE LATTES!!!! I took the opportunity to document my favorite season in my planner, noting my very first #PSL of the year. First I did a little work on my monthly tab to make it look a little more on the Autumn side.
I raided my craft room stash on an effort to think out the hoarded supplies and jazzed up the page a little. I love the way it turned out!
So the tab was done and I was ready to move on with Fall when I decided I wanted to add some fun photos of the month to my planner pages. I took this pic at Target Starbucks while shopping with my kiddos.
I printed out the picture of the Pumpkin Spice Latte sign and adhered it to the planner box on the day I purchased. Cute huh???
I also added a sticker and some journaling to the corresponding calendar page. This is so fun to do! I am definitely going to so more of this type of memory keeping.
I hope you enjoyed seeing how I am going to start using my planner. Come back and look for more crafty fun soon!
Thursday, October 13, 2016
Wednesday, July 8, 2015
50's Party with Cherry Cola Cupcakes
Hey there crafty friend-
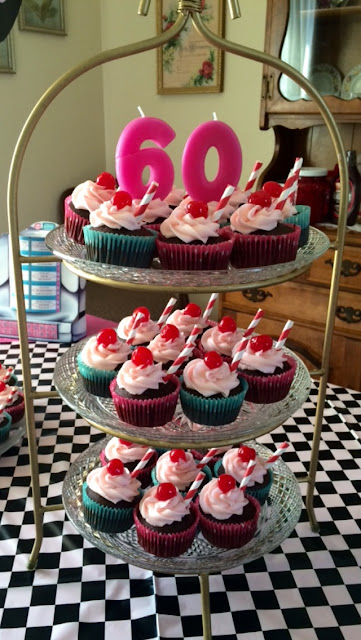
The summer is flying by! I have been very busy with kiddos and parties. You know I love to create fancy party things so I've been in heaven. a few weeks ago my mom turned 60. I know some may think a 60's theme party would have been in order but we couldn't help but celebrate her favorite era, and the year she was born 1955. A 50's party it was. We had hot dogs, hamburgers, fries, soda bar, and a banana split bar. I was in charge of the martinis and of course the cupcakes.
I made cherry cola cupcakes topped with cherries and striped straws. They tasted just like cherry cola! The color scheme was pink and teal with black and white checked accents. The records on the table were cut with my Cricut from black glitter cardstock and topped with pink polka dot labels.
I stacked the cakes on a few different cake plates and added the paper jukebox you see in the background. It looked amazing!
We also had a 50's themed photo booth. I cut a few props with my Cricut using the Nifty Fifties image set,
It all came together beautifully and my mom was very happy.
Well.....thank you so much for stopping by today. I have a few more summer party creations to share with you so please stop by again soon for more inspiration.
Have a great crafty day!
Wednesday, June 3, 2015
It's a Lalaloopsy Party!
Hey Crafty Friends-
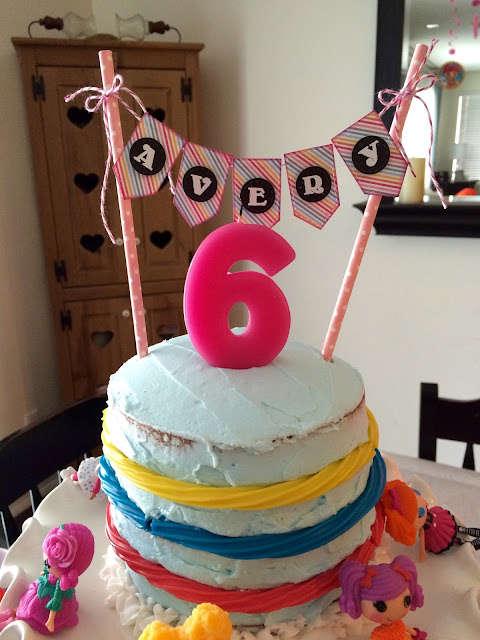
My sweet little princess turned 6 years old a few weeks ago and of course we had to do it up right. She requested a Lalaloopsy party so it was my time to get crafty! My favorite thing to do is the cake display. Here's what I came up with....
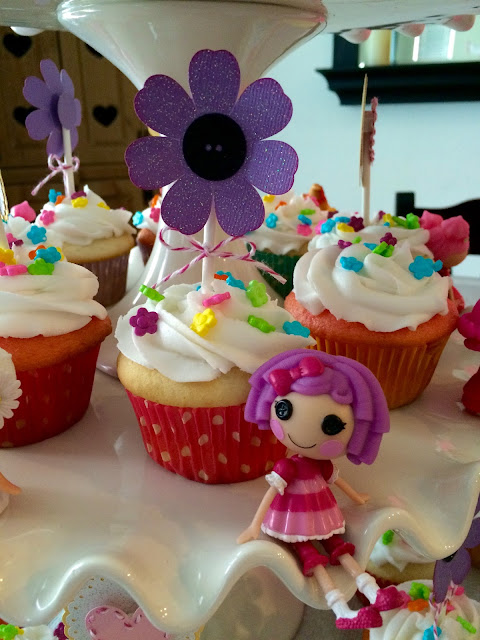
Her favorite character is Pickles so she had to "present" the cake. I made a mixture of vanilla and strawberry cupcakes decorated in white butter cream and flower sprinkles.
The cupcake toppers were cut from purple glitter cardstock and a black glitter cardstock button was glued in the center. Pink bakers twine was tied around the stick for a little extra detail. I placed her Lalaloopsy minis around the cake plate to add to the Loopsy feel.
For the cake topper, I cut out and stamped her name on the banner and attached to bakers twine. I strung the banner between pink paper straws and stuck it in the cake. Of course a number 6 completed the cake. It turned out wonderful and she loved every minute of her special party.
If you have any questions about instructions please leave me a comment and I will get back to you.
Thank you so much for stopping by today. Come back again soon for more inspiration.
Have a great crafty day!
Kerri
Friday, April 10, 2015
Mouse Cupcake Toppers
Hello Crafty Friends-
I have a fun project to share with you today. One of my best friends had a big birthday last week so what do you think my contribution to the party was? Yep......CUPCAKES!!! It's kinda my thing.
.
I used my Cricut Explore to cut the Mouse SVG file at approximately 2.51 x 2.39" from black glitter paper. I also cut another mouse from black cardstock to create a backer. I sandwiched the lollipop stick between the two mouse ear cut outs using a strong adhesive and foam tape to make space for the stick. I used white satin ribbon for the bow and glued it to the ears. I then baked vanilla cupcakes in red/white and pink/white polka dot liners and topped with homemade white icing. I sprinkled the cupcakes with crystal sugar then stuck the toppers in!
And this is what they looked like on the complete display! Super cute huh? I was very pleased with how they turned out. I hope you like them too. I am going to start taking custom orders for cupcake toppers if anyone is interested in ordering. Please message me if you have questions.
I want to take a minute to welcome all my new followers. Thank you, thank you for your support.
Please check back often for more inspiration!
Have a great crafty day,
Kerri
Monday, July 21, 2014
Bridal Shower Cupcake Toppers with my Cricut Explore
Hey crafty friends-
I was recently asked to make cupcake toppers for a family member's bridal shower. I got to have a little fun with this one. I was trying to figure out what shapes to use when my sister in law (the matron of honor) told me the bride's ring is a large blue sapphire. I instantly went to my Cricut Design Space and started looking for the perfect cut. Here is what I came up with.
The ring shape is cut from the Once Upon a Princess image set. I cut the gem from 2 shades of blue cardstock and the ring from silver glitter cardstock. The backing shape was cut from one of my Martha Stewart cake images. I inked all of the edges with Tim Holtz Distress Ink. I did half of the toppers in this design then mixed it up with a different shape.
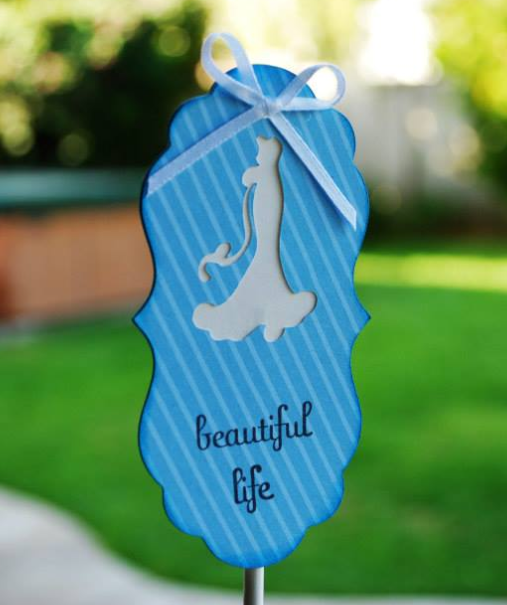
This shape with the wedding dress cutout comes from the Tie the Knot image set. I cut the top layer from a blue stripe paper and a second layer in solid white glitter cardstock to layer behind the blue creating the wedding dress.I stamped the "beautiful life" sentiment in black then inked all the edges in blue distress ink.
Here is what it looked like all put together.
I think the display turned out amazing! Everyone loved the way the dessert table looked and the bride was so happy. I now have requests for cupcake toppers for a baptism and a charity bake sale. I think I may have a business here!
Thank you everyone for hopping by today. Please follow me and come back often for more inspiration.
Have a great crafty day!
Kerri
Tuesday, June 17, 2014
Teacher Gifts
Hey Crafty Friends-
With my kiddos finishing another school year I found myself trying to decide what to give their teachers as an end of the year gift. I raided my craft room and found a set of coffee cozy dies I purchased from Papertrey Ink a few months ago. PERFECT! I let the kids choose the papers and shape they wanted to use and I die cut all the pieces. They helped with the gluing, after I inked up all the edges of course. The flags on the straws were just hand cut to the size I needed to fit the Thank You stamp. The finishing touch was a little twine wrapped around the cozy and a bow on the flag. Simple!
I purchased Starbucks gift cards and placed them inside the decorated cups. Super cute, super simple, and the teachers loved them. I will do this again whenever I need a quick gift. Hmmm, I'm thinking Christmas cups with felt would be adorable.
Thanks for hopping by today. Please follow me and come back often for more inspiration.
Have a great crafty day!
Kerri
Thursday, May 29, 2014
Rapunzel 5th Birthday Celebration!
Hey Crafty Friends-
I am so excited to share with you the projects I made for my daughter's birthday. She asked for a Rapunzel party and my crafty mommy brain instantly went nuts with ideas. The first thing that came to mind was there had to be floating lights! I wanted them to look just like the movie so here is what I did...
I found 12x12 sheets of paper that look like antique parchment. I cut them in half so I have 2 6x12 pieces from each sheet. I found an SVG file of the sun image from Tangled and cut it out of heavy white cardstock. I used it as a stencil over the "parchment" and sponged on orange and purple Distress Ink.
I then used brown Distress Ink to shade the edges and make it look aged as well as look darker on the outside and lighter in the center to give the illusion it is glowing. Then I glued the edges together to create a cylinder shape.
I finished it off by punching small holes in the sides and stringing fishing line to hang them from the ceiling and make it look like they are floating.
I hanged the lanterns from the ceiling above the dining table along with a few of the purple swirls to make a festive setting for the kids. To the right you can see my little treat table. I had so much fun with this!
I made chameleon party blowouts. So cute and so easy.
I started with a template that I used to cut 2 opposite facing pieces of green cardstock. I inked the edges with green Distress Ink, added lighter colored green circles, then added google eyes on top. The mouth was drawn on with a marker. I used a pink party blowout on the center and glued the green pieces on each side to make it look like his tongue sticks out when the kiddos blow into them. Here is what they looked like on the treat table...
Of course there had to be some candy on the table. I wanted to represent the magic flower and the drops of sun so jelly beans did the trick!
My mom found a yellow flower that resembled the one from the movie so I took that and brushed the purple paint in the center. I brushed it with gold glitter and added gold wires in the center. In the frame I printed the flower song song and placed it next to a bowl of yellow and orange jelly beans (a.k.a. drops of sun).
The table was finished off with yellow swirl lollipops and duckling bubble necklaces. The little girls at the party did get a special treat with their party favors. Handmade Rapunzel crowns. They were dancing around swinging their "hair" excited to be a princess for the day.
I continued the hair theme through the decorations around the house. I used a 100 foot roll of yellow plastic table cover from the party store to simulate Rapunzel's hair and draped it down the staircase.
Of course the little Princess in the back wore her Rapunzel dress, wig, and carried around her chameleon. There was so much more to the party. There was a photo booth and all the kids painted their own canvas to take home. It was a great 5th Birthday! Creating parties is my passion and my kiddos will grow up having the best birthdays because mommy can't stay out of her craft room. I hope you enjoyed seeing how it all came together. Please email me or comment if you have any questions about creating this party. Thank you for stopping by. Follow me and come back again soon for more inspiration!
Have a great crafty day-
Kerri
Subscribe to:
Posts (Atom)


