Tuesday, December 25, 2012

Merry Christmas!!!

Hey Crafty Friends-

It's finally here! After all the shopping and crafting, it's time to celebrate Christmas. I made this cute card using Doodlebug Designs North Pole collection and features Berry Red Trendy Twine. This has got to be my favorite holiday card I've done this year. I hope you like it too!


I want to take this opportunity to thank Lesley for giving my first design team experience with Trendy Twine. I am so happy you gave me a chance to work with your wonderful products. I am sad the term is coming to an end and a new team will take over but I am thankful we are friends and you introduced me to a great group of ladies. I'm always here when you need a designer!

To all my followers, I wish you all a very Merry Christmas. Thank you for liking what I do. You have made 2012 a great year for me. Now let's bring on 2013 and great new projects!

Have a great crafty Christmas!
Kerri

Thursday, December 13, 2012

Christmas Gift Book- Candy Cane Trendy Twine

Hey Crafty Friends-

I have another Trendy Twine project on the blog today. I love this Candy Cane twine! It is one of my favorites color combinations. I was dying to use it to do a Christmas book after my Thanksgiving book turned out so great. I hope you like this one too!


To make the cover I cut a piece of red checked cardstock to 4" x 8.5".  I scored it at 4" and 4.5" to create a 4"x4" album with a .5" spine. I embellished the cover with stamped stitches and a few cut outs popped up on foam dots. The finishing touch is the Candy Cane twine bow with a heart gem in the center. For the closure I cut 4 pieces of  twine at 8" and glued 2 pieces to the inside front and inside back of the book then glued down a piece of patterned paper over the twine to finish off the cover and hide the extra twine. Now the twine can be tied in a bow to close the book.

For the pages inside I cut 10 pieces of cardstock at just slightly smaller than 4" sq. They are glued back to back to create 5 pages. They are then attached to the book with hinges made of 1"x4"  strips of paper scored in half.


I hope this shot gives you an idea how the hinge works. I had the kids do a few drawings inside for their grandparents then a popped up a few more cut outs. We also wanted to include a  gift card in the book so I made a little pocket.


I just cut a strip of cardstock and glued 3 sides down to the pages with the top open to hold the cards. Added a sentiment popped up on foam dots.
 
This is a really personal, fun gift for any family member to enjoy. I am making them for everyone! I really hope I have inspired you to make your holiday gift books this year.
 
To order your Candy Cane twine and find more Trendy Twine inspiration please visit the blog at http://trendytwine.blogspot.com/. Make sure you join the December Challenge for a chance to win some yummy twine!
 
Have a great crafty day!
 
Kerri
 

Monday, December 3, 2012

Snowman Tag with Candy Cane Trendy Twine

Hey Crafty Friends-

Can you believe it's December already? I am so excited for Christmas crafting and this little tag is the cutest project to start out this fantastic month.


I am in love with Candy Cane Trendy Twine! The  triple color twist matches perfectly with the Doodlebug North Pole paper I chose for my tag. I started out with a 3.5" x 2.5" green glitter cardstock base. The corners were rounded and the edges inked in red. The snowman tag is a punch out from Doodlebug that I inked the edges in red, stickled the frame with crystal glitter and added google eyes to the snowman. I stamped the Snowmany Hugs sentiment from My Creative Time in black and attached to the green base with foam dots. The holly flags were created by cutting strips of paper to approximately 3" and cutting "V" at the end. The edges were inked in red then attached to the back of the green base. The final touch is a triple Candy Cane twine bow finished with a clear gem in the center. So easy, so quick, and so much fun to make. This is my kind of project!

I hope you enjoyed today's project. For all things Trendy Twine and to join the December Challenge, please visit the website http://trendytwine.blogspot.com/.

Thanks for hopping by! Come back soon for more inspiration.

Have a great Crafty Day,

Kerri

Saturday, November 24, 2012

Core'dinations Hard Core Crop!


Hey Crafty Friends-

Welcome to the 2nd Hard Core Crop! We are bringing in the Holiday season with challenges designed to get you inspired to create for the Holidays. Please head over to the Core blog HERE for crop rules. And we have the Facebook HCC crop page HERE for you to chat and hang out with fellow Hard Core Croppers so make sure you head over there, too. You never know when challenges or giveaways will pop up over there!

For my HCC project I made a cute little Christmas gift bag from Core glitter cardstock! I love the color combo on this one.


The bag was cut from blue glitter Core'dinations cardstock on my Cricut. It cuts like a dream by the way. The trim on the bottom is red shimmer ric rac glued all the way around. Red checked ribbon and green twine make the cutest layered bow topped with a heart from the David Tutera Celebrate Cardmaking System. The embellishment packs are great for these special little projects. If you haven't checked it out yet click HERE to visit the website. There are great videos and how to's to give you plenty of inspiration. Or you can follow the David Tutera Celebrate Facebook page HERE for even more fun! The Holiday Greetings sticker is also from the David Tutera Celebrate line. I inked the edges with red ink to really make it stand out then popped it up on foam dots. The green pine needles behind the sticker are from a punch. I layered a couple for a pop of green. a few gems and white tissue paper stamped with red snowflakes finish it off!

CHALLENGE:
Ok! I showed you my project, now show me yours. I want to see your holiday gift bag creations. Remember your project must include Core'dinations Cardstock and I would love to see David Tutera Celebrate products but it's not a requirement. Link up your project for a chance to win a David Tutera Celebrate prize package. One random winner will be chosen.

Challenges must use the Linkinz below. If you do not have a blog, please feel free to use Photobucket or Flickr or any other photo sharing sight that provides links. Challenges must include Core'dinations ColorCore Cardstock. You may NOT combine this challenge with any of the other HCC challenges but you may complete this challenge as many times as you like. You must link by 8 pm, December 2nd (Sunday). All winners must email ellen_sosnoski@coredinations.com by DECEMBER 12th with their name, address, phone number and prize the won in the subject line. For ex.: Core'dinations Crop Tillie Prize pack Winner.

Thanks for cropping along with us! I hope you will join the challenge and spread your creativity.

Have a great crafty day-

Kerri

Monday, November 19, 2012

Thanksgiving Place Card with Trendy Twine

Hey Crafty Friends-

I have another Trendy Twine project for you! Why not decorate your Thanksgiving table with Orange Truffle twine? I made this adorable place card and embellished with a twine bow. Here's how I did it:


I cut a piece of craft cardstock at 4' x 4" and folded in half. I inked the edges with Seedless Preserves Tim Holtz Distress Ink then wrapped a double strand of twine around the card and tied it in a bow.The cornucopia and leaf are from the Harvest Season stamp set from Lawn Fawn. The images were stamped on craft cardstock, colored with Tim Holtz Distress Markers and cut out. The cornucopia is popped up on foam dots and the leaf glued directly to the card. Finally, the name was stamped to finish the place card.

I love this project. I love quick, easy stuff that really packs a punch and this is it. Try it for your table. These place cards will make your friend and family feel so special.

If you would like to purchase any of the yummy twine colors and get more twine inspiration, please visit the Trendy Twine blog by clicking HERE. Don't forget to join the monthly challenge while you're there!

Have a great crafty day!

Kerri

Sunday, November 18, 2012

Trendy Twine's Birthday Celebration Blog Hop

Hello Everyone and Welcome to Trendy Twine's Birthday Celebration Weekend.
As you know Yesterday was Lesley's Birthday and Today is her Mom's Birthday, so some of "US" her Awesome Design Team has made her Mom a card to make her Birthday Celebration Complete.  
Now if you're here from Yvonne's blog, onecreativemomma.blogspot.com then you're in the right direction, but if you're just passing thru you may want to start at the Trendy Twine Blog because you don't want to miss out on the Blog Candy.
Here is what I made for Lesley's Mom:


I created this sweet birthday card from a craft cardstock base, rounded the corners and inked the edges with Raspberry distress ink. I cut the patterned paper slightly smaller and repeated the process of rounding the corners, inking the edges, then glued it to the base. I cut a frame from brown glitter paper on my Cricut and used it to highlight the words on the card. The frame is popped up on foam dots for dimension. I embossed the Happy Birthday sentiment in white on the bottom corner of the card. To top it off a bow made from Posy Trendy Twine.

You have made it to the end of the hop!


Now to be eligible for the Blog Candy:
"Like" the Trendy Twine Facebook Page
Be a Trendy Twine Blog Follower
"Like" the Jaded Blossom Facebook Page
Leave a Comment on Each Blog Hop Participant
If you can't wait to see if you have won and I know I usually can't
Visit our Trendy Twine Store to purchase some Twine and Sales that we have going on.
BTW, Don't forget the challenge that is going on right now over at Trendy Twine.  You have until the end of the month to link up your project.

Saturday, November 17, 2012

Lesley's Surprise Birthday Hop!

Hey Crafty Friends-

Today we celebrate Lesley's birthday! She brings us our lovely Trendy Twine so now it's time for us to bring her a little happy on her birthday. The Trendy Twine design team has come together for this special hop for each of us to create a card for Lesley. Here's what I came up with.


I used pink and black papers and a sticker from Anna Griffin and a silver card base from David Tutera Celebrate card making system. And of course the star of the card is the Stormy Trendy Twine.This color is so pretty! I couldn't wait to use it for the first time and I love the way it looks with the pink. Not much instruction on this card, it's very simple layering and a little pink ink on the edges.

If you want to see what my Trendy Twine sisters have made the entire hop list is posted below.

1) Trendy Twine: http://trendytwine.blogspot.com/
2) Yvonne: http://onecreativemomma.blogspot.com/
3) Sukie: http://scrappindhilly.blogspot.com/
 
Make sure you come back tomorrow for another hop! We are celebrating all weekend.

HAPPY BIRTHDAY LESLEY!!! I hope you have a wonderful day and many more happy birthdays to come!

Kerri

Monday, November 5, 2012

You are a Blessing Book- Orange Truffle Trendy Twine

Hey Crafty Friends-

I'm back with another project for Trendy Twine. This month's featured twine is Orange Truffle. I LOVE THIS COLOR! I think this is my favorite project I have done as part of the Trendy Twine Team. So let's get to it!


This mini book was made as a gift to my husband for our family to share special photos this season. This book was so easy to make. Here's how I did it...

I started with a craft cardstock base measuring 4" by 8.5". I scored it at 4" and 4.5" creating a 4" mini book with a spine of .5". I inked the edges with Seedless Preserves Distress Ink. I cut the patterned paper at 3.5" x 3.5", inked edges in brown and glued down. I used the Belinda's Borders stamp set from Lawn Fawn to stamp the stitching in brown around the edges of the book. I used the Harvest Season stamp set also from Lawn Fawn to stamp the sentiment in the center of the cover. I cut the frame from brown glitter cardstock using my Cricut and popped it up on foam dots. The pumpkin is also from the Harvest Seasons set. I stamped it on craft cardstock and colored with Tim Holtz markers. I cut it out, popped it on foam dots, and embellished it with a double bow of Orange Truffle twine. The twine closure was done by gluing down a double strand of twine on on each side of the inside cover, making sure they are even so they can later be tied in a bow to close the book. I then cut two craft cardstock squares just under 4" to glue to the inside of the book and cover the twine.

This really was so fast and so fun! I plan on making more of these tiny books for my family members for every season. I hope I have inspired you to give it a try. Thank you so much for visiting my blog today. Please visit the Trendy Twine blog and join in this months challenge. It's a lot of fun.

 Have a great crafty day and come back often for more crafty inspiration!

Kerri

Thursday, October 18, 2012

Spooktacular Halloween Treat Bag with Trendy Twine

Hey Crafty Friends-

Today I have a sweet treat bag featuring Orange Licorice Trendy Twine. It's super cute and any trick or treater would love to receive this bag on Halloween night.


To make the bag topper I cut a piece of craft cardstock at 4" x 4.75", folded it in half and inked the edges in brown ink. I cut a strip of patterned paper at approximately .75" x 6", inked the edges in brown and glued in place leaving the excess hanging over the right edge. I attached he Orange Licorice Trendy Twine bow on the left side to help with placement of the sentiment. I stamped and embossed my sentiment in white then cut my flag on the end. The ghosts were stamped on white cardstock then traced with diamond stickles and cut out.. They were then glued to the ends of the twine bow. The moon is a 1" circle punched from glitter cardstock, slightly inked with orange ink and popped up on a foam dot. The bats were randomly stamped in black to finish it off. For those of you wondering the stamp set is called Happy Haunting by Lawn Fawn.

This project was so easy, so cute, and one of my all time faves! I hope you love it and will try making one yourself. The twine really pops on this bag and just wouldn't look right without it. To purchase Trendy Twine or to get more twine inspiration please visit the Trendy Twine blog by clicking HERE.

Thanks for stopping by. Please come back often for more crafty fun!

Kerri

Sunday, October 14, 2012

Denami Design Halloween Blog Hop

Hey Crafty Friends-

Today you are in for a Halloween treat! I am a huge Denami Design fan so it is my pleasure to be a part of the....wait for it....wait for it...


Today I made for you a cute little kitty Halloween card using the Cuddly Cats stamp set. This is how I did it!


I started by cutting the orange hounds tooth card base at 8" x 5" and folding in half. I cut the black cardstock layer at approximately 3.75" x 4.5" and used a scalloped border punch along the longer sides. I used purple stickles to accent the border. While the stickles dried I stamped two kitties with black ink on orange cardstock then three kitties in white (then embossed in white) on black cardstock and cut them all out. To create the pumpkin I punched a 1" circle from orange cardstock, cut the top off, and freehand cut some grooves on the top and bottom to make it look more pumpkin like. All the orange pieces were then inked around the edges with a little Ripe Persimmon Tim Holtz Distress Ink. Next I wrapped a double strand of Trendy Twine Orange Licorice twine with a bow around the top and bottom of the black layer. The twine gave me a straight line to stamp and emboss my Hey Pumpkin sentiment in white. The black layer was then adhered to the patterned base and the kitties were added, popped up on foam dots. The pumpkin was popped up again on a foam dot and the top needed a double layer of foam to be at the proper height. It might sound complex but it was so easy and fun to do.

I hope you enjoyed today's Halloween card. Please continue on down the hop for more crafty inspiration and a chance to win some great Denami prizes! You have until October 15th at 11:59 pm to leave comments on all the blogs to be entered in the drawing.

Heidi Hurley http://www.hurleyzfamily.blogspot.com/                                                                                                       Kerri Smith http://www.crafttimeandcupcakes.com/                                                                                                  Deanna Dean http://klosetkreations.blogspot.com/ <------ NEXT

Please visit the Denami Design Blog at http://www.denami.blogspot.com/ to start from the beginning of the hop or to purchase the stamp set used above.

Thank you for stopping by. Have a wonderful crafty day!

Kerri


Thursday, October 4, 2012

Fa-boo-lous Witch Pin


Hey Crafty Friends-

I am so excited to be a part of the Fa-bou-lous Halloween inspiration week hosted by Happy Life, Crafty Wife , a.k.a Tamara. For this project I wanted to step out of my crafty box and make something I don't do much of, so I decided on jewelry. I made a witch pin that is so very cute, so easy to do, and so blinged out you'll definitely want one for yourself.


I started with 2" x 2" Memory Glass and Memory Frames by Ranger.


It's very easy to sandwich the paper of your choice between the two pieces of glass and place in the frame.

I chose a cute little witch design from a DCWV stack. I shaded the edges a bit with distress ink and added a glitter paper moon.


I glued different sizes and colors of gemstones around the frame then tied a triple bow of Trendy Twine Orange Licorice twine on the ring.  A pin was added to the back and it's ready to wear!

I love quick, easy projects and this was so fun. I know I will be making more jewelry after this. I hope I have inspired you to give a shot too!

Please make sure you head to Tamara's blog Happy Life, Crafty Wife to participate in the giveaways (a few prizes pictured below) going on and show her some love for putting this Halloween week together!

 Also, please visit the Facebook pages for Trendy Twine and My Thoughts Exactly and click the follow button to keep up with all the product news.

Have a great crafty day,

Kerri

Monday, October 1, 2012

Halloween Treats- Orange Licorice Trendy Twine

Hey Crafty Friends-

Today I am featuring Orange Licorice Trendy Twine on my cute little lollipop holder. It was so easy to make so here we go!

 
I started with a lollipop holder die from My Creative Time and cut it out in green polka dot paper. I cut the spider at 3" from the Designer's Calendar Cricut cartridge in black cardstock. The center of the spider is also a die from My Creative Time, cut from black cardstock. I ran the scalloped circle through the big shot in a polka dot embossing folder,I inked the edges of the scalloped circle in white ink and stickled over it in Crystal. To create the cool twine web, I wrapped the twine around the die cut lollipop holder creating the "X" in the center and a piece going from top to bottom. I cut small pieces of twine and glued them into place between each of the longer strings, creating a diamond shape. Glued a gem in the center and the web is complete. I hope that's not too confusing. So the lollipop was placed in the holder, the spider legs glued on, then the center of the spider was popped up on foam dots. Google eyes finished off the spider. I embellished the lollipop stick by adding an orange flag stamped with Happy Halloween and topped with an Orange Licorice twine bow.
 
Hopefully you found inspiration in today's post to do something fun with those Halloween suckers for the kiddos. For more crafty twine ideas please visit the Trendy Twine Blog!
 
Have a super crafty day!
 
Kerri  

Thursday, September 20, 2012

Teddy Bear Card with Trendy Twine

Hey Crafty Friends-

I'm back with another great Trendy Twine project! I decided after bringing you a bigger project in the beginning of the month I would create a simple card that can be put together in no time at all. This card features Chocolate Sprinkles Trendy Twine which is such a great color to have in your craft closet.


 I started with a Kraft cardstock base measuring 4" x 11" and folded it in half. The corners were rounded and the edges were inked with Tim Holtz Gathered Twigs Distress Ink. The patterned paper was cut at approximately 3.5" x 3", the corners were rounded and the edges inked with Faded Jeans Distress Ink. The doily is 4" which I cut in half. Chocolate Sprinkles twine was woven though the doily. The paper and doily were glued directly to the card base and the seam was covered with Stampin' Up Chocolate Chip polka dot ribbon. The bear was cut from the Create a Critter Cricut cartridge at 3" and inked with Faded Jeans Distress Ink. Kraft cardstock was layered underneath and google eyes were added. I applied stickles around the ears, nose, and tummy for a little added sparkle. He was attached to the card popped up on foam dots. The balloons are coordinating color buttons that I tied with the twine then glued to the bears hand. A double twine bow was then added. And to finish it off "smile" was stamped in the bottom right corner.

If you are interested in purchasing the Chocolate Sprinkles Trendy Twine or any other color please visit the Trendy Twine Blog. While you're there join the September Challenge, there's still time!

Thanks for hopping by. I will be back with another great Trendy Twine Project on Monday October 1st! Come back and check it out.

Have a great crafty day!

Kerri

Wednesday, September 19, 2012

Fa-Boo-Lous Halloween Week!

Hey Crafty Friends-

I hope you all are getting excited for Halloween! To kick off this wonderful Fall season I will be participating in the Fa-Boo-Lous Halloween Week hosted by Tamara at Happy Life, Crafty Wife. Please visit Tamara's blog for more details. I will update you here as well as information becomes available. Please join us and spread the word. It's bound to be a week full of fun inspiration and great giveaways!


Have a great day!

Kerri

Monday, September 10, 2012

Core'dinations Card Design Team

Hey Crafty Friends-

I have been holding on to some top secret information but the time to announce it is finally here!

I have been chosen to be part of the new Core'dinations Card Design Team! I am so excited to start making new cards to showcase for you. There will be more information and a giveaway headed your way soon! Check out the Core'dinations blog for the official announcement to meet the new team!

Have a great crafty day!

Kerri

Monday, September 3, 2012

Magnetic Fishing Game with Trendy Twine

Hey Crafty Friends-

It's a new month and a new featured Trendy Twine color! September is all about Chocolate Sprinkles.
This blue and brown twine just screamed out little boy to me and I knew right a away a Magnetic Fishing Game was the perfect project.


The pole was made from painting a pencil brown, screwing in four small eyes and stringing the twine through. I dipped the end of the pencil in glue and wrapped it several times. Finally, the end of the twine was glued between two magnets.

The bucket was layered with coordinating paper that has been punched with a scalloped border and embellished with a little twine and stickles. Brown polka dot ribbon was used to wrap the handle.


The fish were cut at 2 inches from the Create a Critter Cricut cartridge and the edges were inked in Tim Holtz Faded Jeans Distress Ink on the blue parts of the fish and Gathered Twigs on the brown parts. They were layered together and google eyes and Stickles were added. Each fish is doubled sided which was done using the flip feature on the Cricut. A paper clip was placed inside each fish so it could be "caught" on the pole!


Well, there you have it. Another great project idea using the best twine around! I hope you try making this one yourself.

Don't forget to check out the Trendy Twine blog and join in on the September Challenge!

Have a great crafty day!

Monday, August 20, 2012

Summer Visitors- Krazy for Kraft Trendy Twine

Hey Crafty Friends-

Today is my turn on the Trendy Twine Blog! I'm sticking with the beach theme we've had going this month and decided to do a little something for my house guests popping by on their summer vacation. Why not make them feel like they are staying in fancy hotel and provide them a little luxury. This way they don't have to use my kids' Hello Kitty soap ha ha.


I created a beach inspired hang tag to dress up a bottle of shower gel/bubble bath and attached it using this months featured color Krazy for Kraft. I also rolled up a washcloth and tied a double bow around it for fun! Cute idea huh? Love is in the details and any summer guest would love to see this waiting for them on the bathroom counter.

To make the tag I cut a square piece of craft cardstock at 2 1/2" and rounded the corners. I inked the edges with Picked Raspberry Tim Holtz Distress Pad. The shell is cut from the Crate a Critter Cricut cartridge at 2", inked in the Picked Raspberry, diamond stickled, and a double Krazy for Kraft twine bow is glued on. I attached it to the tag using foam dots. The sentiment is stamped in black and pink gems are added to each side. The entire tag is then edged in diamond stickles. I twisted a double strand if Kraft twine around the cap, crisscrossed it and glued it down with glue dots. I then attached the tag to the twine and the bottle for extra security. I rolled up a washcloth and tied a double bow around it and set everything up on the bathroom counter for my guests.

For more Trendy Twine inspiration or to purchase please visit the Trendy Twine blog http://trendytwine.blogspot.com/. Don't forget about the August Challenge going on. Click HERE for more information.

Thanks everyone for hopping by. Come back soon for more crafty fun!

Kerri

Saturday, August 18, 2012

My Craft Channel Guest Blogger

Hey Crafty Friends-

I am so excited to be guest blogging for My Craft Channel today! For those that are new to my blog WELCOME. Glad to have you hop on by. For today's post I decided I am done with Summer and ready for Fall. Bring on sweaters, pumpkin pie, and holiday crafting I say! With all the great new products being released, I was inspired to bring you a Happy Halloween Party idea. Let's get started.


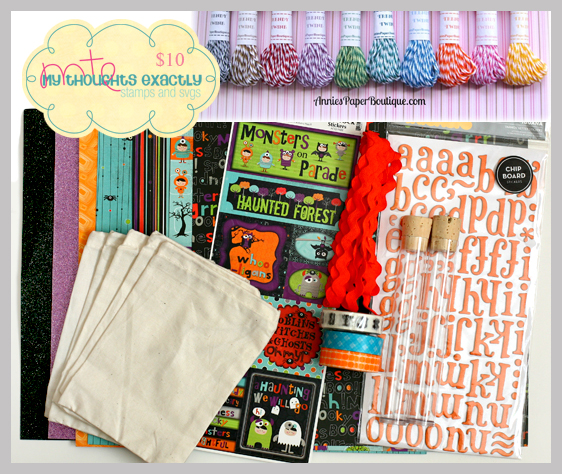
Here is a list of all the supplies I used for each project:

Trick or Treat bag- Cricut, CTMH Art Philosophy Cricut cartridge, DCWV Bewitched stack, Tim Holtz Seedless Preserves Distress Pad and applicator, sheer plum ribbon, Orange Licorice Trendy Twine, black flower, Crystal stickles, purple gems, foam dots, Fabric Tac, black tissue paper

Cupcake Stand and topper- Lifestyle Crafts Cupcake Stand Die set, Sizzix Big Shot, DCWV Bewitched stack, Tim Holtz Ripe Persimmon Distress Pad and applicator, paper doily, Orange Licorice Trendy Twine, Stampin’ Up postage stamp punch, toothpick, purple gems, Fabric Tac

Spooky Candle- Flameless candle, DCWV Bewitched stack, Tim Holtz Ripe Persimmon Distress Pad and applicator, Stampin’ Up scalloped border punch, Orange Licorice Trendy Twine, Crystal Stickles, purple gems, foam dots, Fabric Tac

Now on to how I did it!


Cut the bag on page 23 of the Art Philosophy Cricut cartridge at Fit to Page size. Fold and glue together to build the bag. Ink all the edges with Tim Holtz Seedless Preserves Distress Pad. Cut the Trick or Treat card from the DCWV Bewitched stack and attach to the front of the bag using foam dots. In the top left corner of the bag attach a double bow made from the sheer plum ribbon, glue black flower in the center of the bow then a glue a double bow made from Orange Licorice Trendy twine under the flower. Adhere purple gems to the other 3 corners of the bag and apply stickles around the trick or treat.


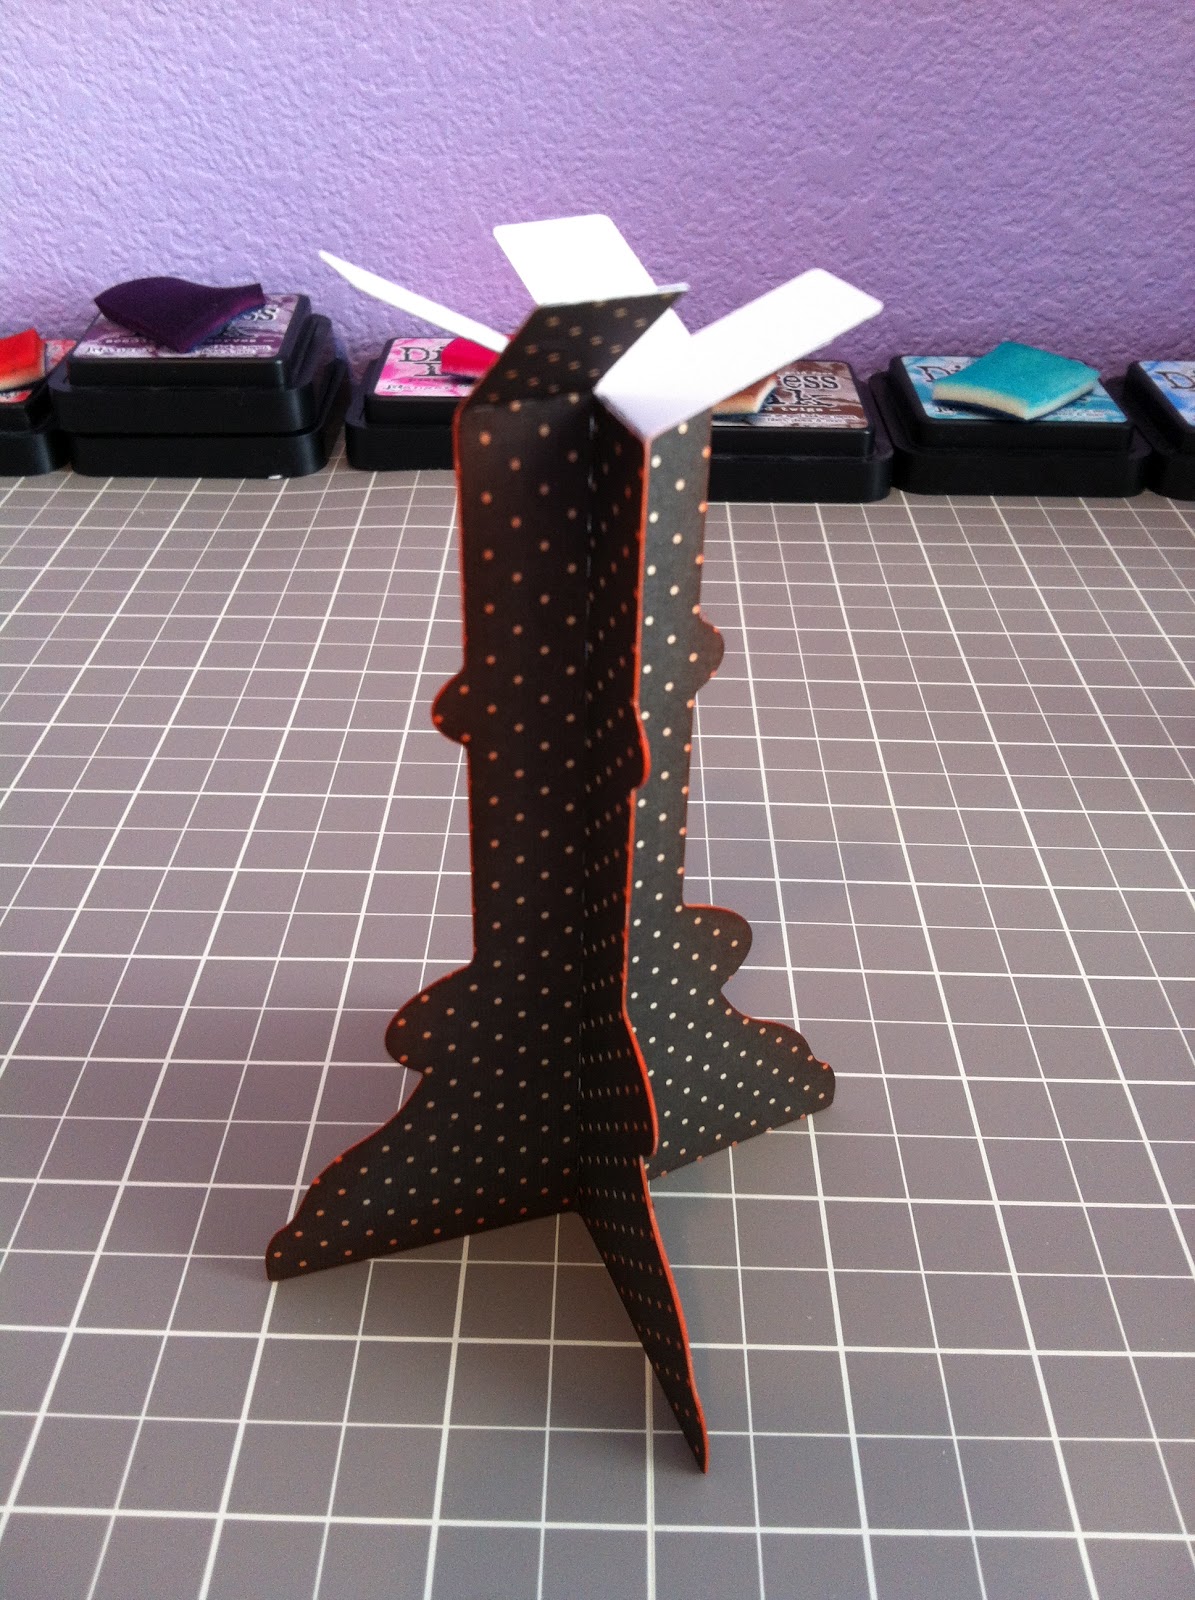
Cut 4 of the stand bases, 1 support circle and 1 scalloped circle top from the Lifestyle Crafts Cupcake Stand die. Ink all the edges with Tim Holtz Ripe Persimmon Distress Pad. Glue the 4 base pieces back to back to create the full base. Glue Orange Licorice Trendy Twine down the base to cover the fold lines. Embellish the edges with purple gems. Glue down support circle then glue scallop circle on top. Weave Orange Licorice Trendy Twine through the paper doily and glue it to the stand top. The topper is made from an owl image punched from the DCWV Bewitched stack using the Stampin’ Up postage stamp punch. Edges are inked with Tim Holtz Seedless Preserves Distress Pad. Purple gems are added for eyes and double Trendy Twine bow is glued to the bottom. Attach to the toothpick.

                                    HERE ARE A FEW PICS SHOWING HOW TO PUT THE STAND TOGETHER


                                                                Last but not least is the Spooky Jack o Lantern candle


Cut a strip of paper from the DCWV Bewitched stack, punch with Stampin’ Up scalloped border punch and ink the edges with Tim Holtz Ripe Persimmon Distress Pad. Add crystal stickle dots between scallops. Glue strip around candle then glue double strand of Orange Licorice Trendy Twine on top. Cut spooky Jack o Lantern tag and attach to candle with foam dots. Embellish tag with purple stones and crystal stickles to the Jack o Lantern face.

Well....there you have it! My Halloween Party projects. I hope you have been inspired to start your Fall crafting. Please follow my blog or you can find me on Facebook and Pinterest. I promise there is a lot more crafty inspiration headed your way if you do!

I want to say a BIG thank you to My Craft Channel for having me guest blog! And thank you all for hopping by. Have a great crafty day!

Kerri


Sunday, August 12, 2012

Denami Design Bright Bold & Beautiful Blog Hop

Hey Crafty Friends-

I am such a Denami Design addict! I am just so excited to be a part of another hop. No chit chat! Lets get to the card.


I started with a craft card base and rounded the corners. I embossed the Teeny Heart Background stamp in white and created the rainbow by using a foam blending tool and Tim Holtz Distress Inks in Picked Raspberry, Peacock Feathers, and Preserves. I just streaked the colors across the card then gently patted with a paper towel to remove the excess ink from the embossing. To create the clouds I used a cupcake punch and punched out the the top of the cupcake in white cardstock, inked the edges in Peacock feathers and went over the edges with diamond stickles. I then used the Upright Happy Birthday stamp and colored each letter individually and stamped the word HAPPY on the clouds. The clouds are layered slightly over each other and popped up on foam dots. Three pink gem stones in the bottom right corner add a little bling. The card is finished off by a double bow of Strawberry Cupcake Trendy Twine.

I am so happy with how this card turned out. This is one where I started off with a different idea of what the card would be and went a totally different direction. Thank you so much for hopping by! Don't forget to hop on over to the next blog on the list


    Kerri Smith http://www.crafttimeandcupcakes.com/    <-------  you are here

                    Deb W. http://mycraftroomcreations.blogspot.com/

If you want to start from the beginning of the list or if you are interested in the Denami stamps you see please visit Denami Design http://www.denami.blogspot.com/

Thursday, August 9, 2012

Core Cards Creative Frenzy

Hey Crafty Friends-

Today I am posting my entry for the Core'dinations Design Team Call. It has been a tough job to choose three of my favorite projects to submit, but I did it and here they are!

                                                                           STRAWBERRY BIRTHDAY CARD


                                                                                SEASONS GREETINGS CARD


                                                                                               BOTTLE TAG


Wish me luck everyone!

Monday, August 6, 2012

Day at the Beach - Krazy for Kraft Trendy Twine

Hey Crafty Friends-

It's time for another craft project with Trendy Twine! The color for August is Krazy for Kraft. The theme is BEACH. I knew immediately what I was going to create with my twine, a net!


I started with a simple wood frame you can get for $1 at Michaels. I painted it with Martha Stewart craft paint that has a pearl sheen. I freehand cut the "sand" at the bottom of the frame and inked the edges. The sand castle, shell, starfish, and seahorse were all cut from the Create a Critter Cricut cartridge. The edges were inked and stickles were added for a little pizazz. To incorporate the monthly challenge into my project I used a toothpick and washi tape to create the flag for my castle.

Now for the focus of my project, the fantastic net!


To create the net I cut 10 pieces of twine at about 12 inches and taped them down to a nonstick craft mat. I then cut 15 pieces of twine also at 12 inches. I started on the bottom, left side and tied each of the 15 pieces to the cross pieces that were taped down. I hope this picture will help explain it. It's not hard to do at all. My kiddos erased the video I had for you so a photo will have to do.


I hope you get the idea. Tie a knot around each of the cross pieces as you move up the grid. Tie a knot on one strand then move up to the next one and tie another knot around that strand. When you're done you will have a fabulous net to drape over your frame. Make sure to snip the ends off !

I hope you will try and make your own Trendy Twine net for your beach project. Don't forget to check out of the August challenge on the Trendy Twine Blog. I will have another great Trendy Twine project for you on August 20th.

Thanks for stopping by and come back soon!


Wednesday, July 18, 2012

Crafty Coffee Weather!

Hey Crafty Friends-

The weather here in Vegas has been crazy! It went from sunny and 116 degrees to cloudy, stormy skies and 86 degrees! So since I work better under pressure of course I waited until this week to get my Berry Red Trendy Twine project done. I was so inspired by our "cold" snap I had to create a cute little card to prove my undying love for a cup of hot COFFEE! 


The base card is craft cardstock cut at 10" x 4" and folded in half. I ran it through the Big Shot using the Swiss Dot Cuttlebug folder and rounded the corners. The edges are inked using Tim Holtz Festive Berries Distress Ink. The coffee mug is DCWV white glitter cardstock cut at 3" from the Love You  a Latte Cricut cartridge. The heart was cut from the same cartridge in red DCWV glitter cardstock at 1.5". Brown cardstock backed the mug to create the coffee. The edges of the mug were lightly inked with Gathered Twigs Distress Ink. The heart and mug were both popped up on foam dots for dimension. The sentiment "Where have you been all my life" from My Creative Time, You Had Me at Chocolate stamp set was stamped in the same Gathered Twigs Distress Ink. A double strand of Berry Red Trendy Twine was wrapped around the bottom of the card, the another double strand  wrapped around the top an tied in a double bow!

I hope you like my simple little card. It made me smile! I'll have more Trendy Twine goodness for you on Monday August 6th. Please come back and check it out!

Visit the Trendy Twine blog at http://trendytwine.blogspot.com/ to get your twine and start crafting!
You still have time to participate in the July Challenge! Details here.

Kerri

Monday, July 16, 2012

Denami Design Blog Hop

Hey Crafty Friends-

I will be participating the in the Denami Design Bright, Bold and Beautiful Blog Hop on August 12th


I hope you'll come back and follow along! Start at the Denami Blog http://www.denami.blogspot.com/

Have a crafty day!

Kerri

Monday, July 2, 2012

Hooray for the Berry Red, White, and Blue!

Hey Crafty Friends-

Well the day has finally come. My first official Trendy Twine Design Team post! This month we are getting in the patriotic spirit with Berry Red twine. With Independence Day just two days away, I whipped up a simple party idea that will impress your BBQ guests. Festive embellished water bottles paired with flag straws are sure to get everyone feeling the love for the U.S.A.


This is so simple to do. Even with two days to go you have plenty of time to get them done. I purchased a huge roll of the red & white checked ribbon at Costco for around $7. I pulled the label off of the bottle then wrapped the ribbon around to check the size and cut the appropriate length. I used my ATG gun to attach it to the bottle. I tied Berry Red Trendy Twine around the top and bottom of the bottle to jazz it up even more.


The scalloped circles were cut using Lifestyle Crafts dies, but to do in mass I think I would use the Cricut or Silhouette to cut as many as you need. The large scallop cut from blue cardstock and inked with white pigment ink is approx 2.25" and the craft cardstock scallop inked in red and stickles added is approx 1.75". The Berry Red twine was wrapped around the smaller scallop three times and glued in place. A red button, a bow tied in Berry Red and Blue Berry layered on top of the button and a little bling in the center of the bow. The scalloped circles were layered using foam dots for dimension.


The straw flag is even quicker and easier. It too is cut from a Lifestyle Crafts die but you can easily cut a rectangle, make a V cut at the end, and cut slits for the straw to fit through to create your own. I inked the edges in blue distress ink, stamped the sentiment in red, added blue gems, and finished it with a Berry Red twine bow.

These projects were so fun to make. I hope you will give them a try for your 4th of July Celebration!

Saturday, June 30, 2012

Quick Saturday Card

I know I already posted today but I had a little time when I was working on my craft room to bust out a cute little card.


I bought a pack of Martha Stewart mini note cards at Joann a while back. So today I decided I needed to use them. They are a softer peachy pink but I inked the edges with the new Tim Holtz summer ink pad Picked Raspberry. I hit the edges a little darker and did bring the ink in a bit to create the pink halo effect. The stamped sentiment is from the Close to My Heart set So Lucky.I stamped it in dark brown ink and added the pink gems. For the envelope I inked just the edges a couple times to get the dark pink to show. I added the Strawberry Cupcake Trendy Twine bow. To finish it off a glitter heart with a pink gem. So easy, so quick, and so cute! Hope you like it.

Sunday, June 3, 2012

Trendy Twine Design Team

Hey Crafty Friends-

Well....the cat is out of the bag. I'm now officially part of the Trendy Twine Design Team! I am so excited to get crafty, and create some great projects with this fantastic product!

 For those of you that are new to my blog I'd like to tell you a little about myself. I have been married to my retired Air Force hubby for 16 years. We have two beautiful girls, ages 3 and 4. I have been a crafter for as long as I can remember, but I have become more serious about it in the last year. I created my blog, I have a project published in Cricut Birthday Idea Book this month, and now I am on my first design team. All of this in less than a year! I would classify my crafting style as a little shabby chic, a little cutesy, and very fun! I love to do more elegant projects when the mood strikes but no matter what, I always try and keep my creations quick, simple, and stunning. Enough blabber about me. On to the projects I created that landed me a spot on the team. Oh...and I made the cupcakes too!


Everyone knows I love cupcakes right? So I couldn't resist creating this cupcake stand using the Cupcake Stand die from Lifestyle Crafts. The paper I used was a Martha Stewart stack I bought at Joann. All the edges were inked using Tim Holtz Festive Berries distress ink pad. The twine I chose to accent my project is Trendy Twine Valentine Cherry Cupcake. I used it to cover seams on the stand, weaved it through a paper doily placed under the cupcake, and added twine bows to the doily and the strawberry topper. A few pieces of bling and it's perfection! If I do say so myself .


To make the card I used the same Martha Stewart paper and took advantage of the negative space left from cutting the base circle for the cupcake stand. I cut the card at 4 1/2 x 6 and lined the circle up over the strawberry image. I popped the card up on foam dots to create a little more dimension. The circle was framed with the Valentine Cherry Cupcake twine, and a twine bow added to the top. Rounded corners, a little bling, and a Happy Birthday stamp from My Creative Time finishes it off!

Well crafty friends, I hope you like what you see. I have so many creative ideas swirling around in my head that I can't wait to share with you. I'm hoping to start filming some videos for you soon. My first post will be up on the Trendy Twine blog on July 2nd, and another on July 18th.

Here is a list of the entire Trendy Twine design team and their blog links. Please hop along and visit each one leaving a comment on all of them and the Trendy Twine blog  to be entered in the giveaway. You could win a spool of your choice!

New Members
■ Anita http://happypapercrafthappenings.blogspot.com/
■ Ashley http://theglamoroussideofscrapping.blogspot.com/
■ Becki http://www.happycardfactory.com/
■ Candi http://chaos-n-crafts.blogspot.com/
■ Helen http://www.craftingcricutmom.com/
■ Izzy http://writesnapscrap.blogspot.com/
■ Jessica http://kissinkrafts.blogspot.com/
■ Karen http://scrappycanuck.wordpress.com/
■ Kate http://www.scrapperscreativecorner.blogspot.com/
■ Kerri http://www.crafttimeandcupcakes.com/
■ Margaret http://auntmargaretdesigns.blogspot.com/
■ Sukie http://scrappindhilly.blogspot.com/
■ Yvonne http://onecreativemomma.blogspot.com/

Returning DT
■ Alyssa http://mythoughtsexactly.co/alyssas-blog/
■ Jamie http://jamiek711designs.blogspot.com/


Thanks for stopping by! Come back soon for more inspiration!