Thursday, October 13, 2016

Fall Planner Featuring Pumpkin Spice Latte

Hi Crafty Friends!

I don't know about you but it is time for three of my favorite things. Fall, planners, and PUMPKIN SPICE LATTES!!!! I took the opportunity to document my favorite season in my planner, noting my very first #PSL of the year. First I did a little work on my monthly tab to make it look a little more on the Autumn side.


I raided my craft room stash on an effort to think out the hoarded supplies and jazzed up the page a little. I love the way it turned out!


So the tab was done and I was ready to move on with Fall when I decided I wanted to add some fun photos of the month to my planner pages. I took this pic at Target Starbucks while shopping with my kiddos.


I printed out the picture of the Pumpkin Spice Latte sign and adhered it to the planner box on the day I purchased. Cute huh???


I also added a sticker and some journaling to the corresponding calendar page. This is so fun to do! I am definitely going to so more of this type of memory keeping.

I hope you enjoyed seeing how I am going to start using my planner. Come back and look for more crafty fun soon!


Wednesday, July 8, 2015

50's Party with Cherry Cola Cupcakes

Hey there crafty friend-

The summer is flying by! I have been very busy with kiddos and parties. You know I love to create fancy party things so I've been in heaven. a few weeks ago my mom turned 60. I know some may think a 60's theme party would have been in order but we couldn't help but celebrate her favorite era, and the year she was born 1955. A 50's party it was. We had hot dogs, hamburgers, fries, soda bar, and a banana split bar. I was in charge of  the martinis and of course the cupcakes.

50's Party


I made cherry cola cupcakes topped with cherries and striped straws. They tasted just like cherry cola! The color scheme was pink and teal with black and white checked accents. The records on the table were cut with my Cricut from black glitter cardstock and topped with pink polka dot labels.

50's Party

I stacked the cakes on a few different cake plates and added the paper jukebox you see in the background. It looked amazing!

We also had a 50's themed photo booth. I cut a few props with my Cricut using the Nifty Fifties image set,

50's Party

It all came together beautifully and my mom was very happy.

Well.....thank you so much for stopping by today. I have a few more summer party creations to share with you so please stop by again soon for more inspiration.

Have a great crafty day!

Wednesday, June 3, 2015

It's a Lalaloopsy Party!

Hey Crafty Friends-

My sweet little princess turned 6 years old a few weeks ago and of course we had to do it up right. She requested a Lalaloopsy party so it was my time to get crafty! My favorite thing to do is the cake display. Here's what I came up with....

Lalaloopsy Party

Her favorite character is Pickles so she had to "present" the cake. I made a mixture of vanilla and strawberry cupcakes decorated in white butter cream and flower sprinkles.

Lalaloopsy Party

The cupcake toppers were cut from purple glitter cardstock and a black glitter cardstock button was glued in the center. Pink bakers twine was tied around the stick for a little extra detail. I placed her Lalaloopsy minis around the cake plate to add to the Loopsy feel.

Lalaloopsy Party

For the cake topper, I cut out and stamped her name on the banner and attached to bakers twine. I strung the banner between pink paper straws and stuck it in the cake. Of course a number 6 completed the cake. It turned out wonderful and she loved every minute of her special party.

If you have any questions about instructions please leave me a comment and I will get back to you.
Thank you so much for stopping by today. Come back again soon for more inspiration.

Have a great crafty day!

Kerri

Friday, April 10, 2015

Mouse Cupcake Toppers

Hello Crafty Friends-

I have a fun project to share with you today. One of my best friends had a big birthday last week so what do you think my contribution to the party was? Yep......CUPCAKES!!! It's kinda my thing.
.


I used my Cricut Explore to cut the Mouse SVG file at approximately 2.51 x 2.39" from black glitter paper. I also cut another mouse from black cardstock to create a backer. I sandwiched the lollipop stick between the two mouse ear cut outs using a strong adhesive and foam tape to make space for the stick. I used white satin ribbon for the bow and glued it to the ears. I  then baked vanilla cupcakes in red/white and pink/white polka dot liners and topped with homemade white icing. I sprinkled the cupcakes with crystal sugar then stuck the toppers in!


And this is what they looked like on the complete display! Super cute huh? I was very pleased with how they turned out. I hope you like them too. I am going to start taking custom orders for cupcake toppers if anyone is interested in ordering. Please message me if you have questions.

I want to take a minute to welcome all my new followers. Thank you, thank you for your support.
Please check back often for more inspiration!

Have a great crafty day,

Kerri

Monday, July 21, 2014

Bridal Shower Cupcake Toppers with my Cricut Explore

Hey crafty friends-

I was recently asked to make cupcake toppers for a family member's bridal shower. I got to have a little fun with this one. I was trying to figure out what shapes to use when my sister in law (the matron of honor) told me the bride's ring is a large blue sapphire. I instantly went to my Cricut Design Space and started looking for the perfect cut. Here is what I came up with.

Bridal Shower Cupcakes

The ring shape is cut from the Once Upon a Princess image set. I cut the gem from 2 shades of blue cardstock and the ring from silver glitter cardstock. The backing shape was cut from one of my Martha Stewart cake images. I inked all of the edges with Tim Holtz Distress Ink. I did half of the toppers in this design then mixed it up with a different shape.

Bridal Shower Cupcakes

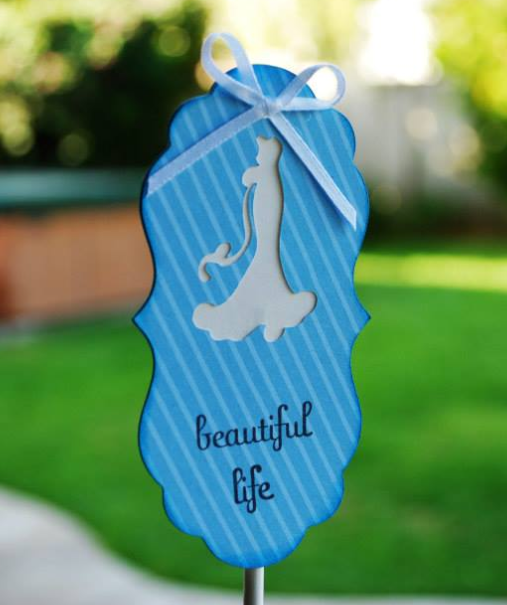
This shape with the wedding dress cutout comes from the Tie the Knot image set. I cut the top layer from a blue stripe paper and a second layer in solid white glitter cardstock to layer behind the blue creating the wedding dress.I stamped the "beautiful life" sentiment in black then inked all the edges in blue distress ink.

Here is what it looked like all put together.

Bridal Shower Cupcakes

I think the display turned out amazing! Everyone loved the way the dessert table looked and the bride was so happy. I now have requests for cupcake toppers for a baptism and a charity bake sale. I think I may have a business here!

Thank you everyone for hopping by today. Please follow me and come back often for more inspiration.

Have a great crafty day!

Kerri

Tuesday, June 17, 2014

Teacher Gifts

Hey Crafty Friends-

With my kiddos finishing another school year I found myself trying to decide what to give their teachers as an end of the year gift. I raided my craft room and found a set of coffee cozy dies I purchased from Papertrey Ink a few months ago. PERFECT! I let the kids choose the papers and shape they wanted to use and I die cut all the pieces. They helped with the gluing, after I inked up all the edges of course. The flags on the straws were just hand cut to the size I needed to fit the Thank You stamp. The finishing touch was a little twine wrapped around the cozy and a bow on the flag. Simple!


I purchased Starbucks gift cards and placed them inside the decorated cups. Super cute, super simple, and the teachers loved them. I will do this again whenever I need a quick gift. Hmmm, I'm thinking Christmas cups with felt would be adorable.

Thanks for hopping by today. Please follow me and come back often for more inspiration.

Have a great crafty day!

Kerri


Thursday, May 29, 2014

Rapunzel 5th Birthday Celebration!

Hey Crafty Friends-

I am so excited to share with you the projects I made for my daughter's birthday. She asked for a Rapunzel party and my crafty mommy brain instantly went nuts with ideas. The first thing that came to mind was there had to be floating lights! I wanted them to look just like the movie so here is what I did...


I found 12x12 sheets of paper that look like antique parchment. I cut them in half so I have 2 6x12 pieces from each sheet. I found an SVG file of the sun image from Tangled and cut it out of heavy white cardstock. I used it as a stencil over the "parchment" and sponged on orange and purple Distress Ink.


I then used brown Distress Ink to shade the edges and make it look aged as well as look darker on the outside and lighter in the center to give the illusion it is glowing. Then I glued the edges together to create a cylinder shape.


I finished it off by punching small holes in the sides and stringing fishing line to hang them from the ceiling and make it look like they are floating.


I hanged the lanterns from the ceiling above the dining table along with a few of the purple swirls to make a festive setting for the kids. To the right you can see my little treat table. I had so much fun with this!

I made chameleon party blowouts. So cute and so easy.


I started with a template that I used to cut 2 opposite facing pieces of green cardstock. I inked the edges with green Distress Ink, added lighter colored green circles, then added google eyes on top. The mouth was drawn on with a marker. I used a pink party blowout on the center and glued the green pieces on each side to make it look like his tongue sticks out when the kiddos blow into them. Here is what they looked like on the treat table...


Of course there had to be some candy on the table. I wanted to represent the magic flower and the drops of sun so jelly beans did the trick!


My mom found a yellow flower that resembled the one from the movie so I took that and brushed the purple paint in the center. I brushed it with gold glitter and added gold wires in the center. In the frame I printed the flower song song and placed it next to a bowl of yellow and orange jelly beans (a.k.a. drops of sun).


The table was finished off with yellow swirl lollipops and duckling bubble necklaces. The little girls at the party did get a special treat with their party favors. Handmade Rapunzel crowns. They were dancing around swinging their "hair" excited to be a princess for the day.


I continued the hair theme through the decorations around the house. I used a 100 foot roll of yellow plastic table cover from the party store to simulate Rapunzel's hair and draped it down the staircase.


Of course the little Princess in the back wore her Rapunzel dress, wig, and carried around her chameleon. There was so much more to the party. There was a photo booth and all the kids painted their own canvas to take home. It was a great 5th Birthday! Creating parties is my passion and my kiddos will grow up having the best birthdays because mommy can't stay out of her craft room. I hope you enjoyed seeing how it all came together. Please email me or comment if you have any questions about creating this party. Thank you for stopping by. Follow me and come back again soon for more inspiration!

Have a great crafty day-

Kerri

Monday, March 17, 2014

HAPPY ST. PATRICK'S DAY!

Happy St. Paddy's Day crafty friends! I hope you have a day filled with lots of festive crafting. Oh, and green beer!


I love the Paper Lace background on this card. It adds just the right touch.

Have a great crafty day!

Kerri

Friday, February 7, 2014

Cricut Cards Magazine- Published Project

Hey Crafty Friends-

Today I wanted to share with you my Christmas card that was published in the December 2013 edition of Cricut Cards Magazine. It's on page 21!


I wish I could have shared it with you earlier but rules are rules. I had to wait at least until the end of January. Didn't it turn out so cute? It's one of my favorites I've ever done. I used the Sweet Treats and Elegant Edges Cricut cartridges to cut my cupcake and word layer. Complete instructions are on page 22 of the magazine if you are a subscriber.

Have a great crafty day!

Kerri

Friday, January 31, 2014

Snowflake Birthday Cupcake Toppers

Hey Crafty Friends-

I'm back today with the cutest little project you ever did see. I am making cupcake toppers for my twin nephews' fifth birthday bash. They are throwing a Disney Frozen themed party, so I wanted to make something extra special to match the theme. Here is what I came up with...


Cute, right??? Here is how I did it:


I used the Winter Lace Cricut  cartridge to cut the white snowflake layer from Core'dinations glitter cardstock called white gloves. It was cut at 2.5 in. The blue snowflake layer was cut from Core'dinations glitter cardstock called blue diamonds. It was also cut at 2.5 in. The number 5 was cut from Sweet Treats Cricut cartridge at 1.25 in. from a darker blue glitter cardstock.


I used blue and white striped paper straws in place of toothpicks to stick in the cupcake. They work well for larger toppers like this. They are very sturdy and easy to glue the pieces to. The brand I bought came with 24 straws so I cut them in half so I can make 48 toppers. Before assembling I inked the edges of both snowflake layers with Tim Holtz Distress Ink in Faded Jeans.


I stared by pinching about an inch of the straw flat. I didn't completely flatten it though, just enough to glue it down and have some dimension between the layers. I glued it to the front of the blue snowflake layer going about up to the middle of the inside of the snowflake.


Then I glued the white layer down on top of the straw. The final step was to adhere the dark blue 5 using foam dots I cut down to size. So cute and so dimensional.


The party is next week so I'll be sure and take lots of pictures of the finished cupcakes and share them with you. These little projects are my favorite things to do. They will make my nephews so happy and the party guests will enjoy the cupcake display. 

Follow my blog,  my Facebook page or my Pinterest page for more inspiration. Have a great crafty day!

Kerri

Saturday, January 25, 2014

Papertrey Ink January Blog Hop

Hey Crafty Friends!

Today I am linking up to the Papertrey Ink January Blog Hop. The Challenge is to make a card using shades of pink. That is not hard for me since I love pink. Here is what I created


I used the Tag Sale #5 die to cut the pink patterned paper and I used Heart-2- Heart #1 mini stamp set with coordinating die to do the coffee cup. The sentiment was stamped using the Latte Love stamp set. Everything layered together beautifully with a few foam dots under the tag and the I heart coffee to add dimension. I hope you like, and I hope you will come back soon for more crafting LOVE.

Have a great crafty day!

Kerri

Sunday, December 8, 2013

Let My Favorite Season Begin!

Hey Crafty Friends-

Well between a sick hubby, two sick kiddos, and Thanksgiving I haven't been able to share my favorite time of year with you. My tree is up! I love it so much!


I bought this tree last year at Lowes and it's my favorite tree I have ever owned. It's a slim tree with multi-colored lights which is very hard to find. And it's 7 feet tall. I have a tendency to go for a homespun feeling with my Christmas tree so I love using my felt ornaments and snowflakes. Cute huh?


For my topper I used one I bought at least 10 years ago. You just don't find toppers like this anymore. It might  not exactly match the theme of the rest of my tree but it reminds me of how my grandma used to decorate her house at Christmas time so I put it up for all to see. Isn't that what the holidays are all about?

I have some new things coming to the blog soon. I am attempting to do a December Daily book for the first time. I will share that with you as soon as I get the first week of the month done. I am planning out my cookie exchange for Christmas day. The cookies have to be great but the presentation has to wow them. Christmas cards are in the works and I am also applying for a few more design teams this month. So wish me luck!

Thanks for hopping by today Christmas Crafty Friends. I hope you have a great Sunday!

Kerri

Tuesday, November 12, 2013

Core'dination Hard Core Crop Tag Challenge Winner

Hey Crafty Friends,

Thank you to everyone that linked and for my Core'dinations Tag Challnege. The winner is.......

JACKIE SCHACHTER


Please email coredt@coredinations.com with your full name, address, phone number with my challenge name in the subject line. Thank you for participating.

Have a great crafty day!

Kerri


Sunday, November 10, 2013

Denami Design- A Touch of Twine Blog Hop

Hey crafty friends-

I'm back again with another Denami Design Blog Hop. This month's theme is A Touch of Twine. I use twine in almost everything I do so this hop is a perfect fit for me. Today I created a Christmas tag using the Cuddly Cats stamp set. I think kitties go with everything, so why not incorporate them into my tag!


I stamped the cat in green on a scalloped circle punched from craft cardstock and inked the edges in red and added stickles for a little jazz. The design is pretty straight forward layering so I won't go into to much detail. I glued green twine on top of my red bow and tied a jingle bell in the middle. So quick, so easy, so fun.

Now for the good part.....Prizes: Denami Design is giving away THREE $20 gift certificates to their website! They'll be giving away one gift certificate to a random participant (DT members not eligible) and then they'll also be giving away TWO gift certificates to TWO people who comment along the hop! You have until November 11, 2013, 11:59 pm PST, to leave comments on all the blogs (to be eligible for a prize). Below is the next blog on the hop but if you get lost or want to start from the beginning go to the Denami Design Blog for the full list and details. 

Tina Milbourn http://denamiaddict.blogspot.com/
Kerri Smith http://www.crafttimeandcupcakes.com/       <--------- YOU ARE HERE                       
Dana Seymour http://kismetartlife.blogspot.com


Thanks for hopping along with me today. Check back often for more crafty inspiration!

Kerri

Saturday, November 2, 2013

Core'dinations: Hard Core Crop Tag Challenge


HEY CRAFTY FRIENDS!

Welcome to Core'dinations Hard Core Crop! Make sure you grab your blinkie and wear it proudly ALL WEEK LONG! Core'dinations is offering a prize for using it as their Facebook profile photo so grab it here and head over to the Facebook event page and let them know.  This is the link to the blinkie: 


If you have joined us before the rules work pretty much the same. Whether this is your first time or you are a returning Hard Core Cropper PLEASE make sure you head over to the Core blog for a full list of rules HERE. They are pretty straight forward..you must use Core visibly on your projects, upload using the linky at the bottom of this post by midnight November 10th EST, and follow my challenge rules but please make sure you follow the rules and check them out on the Core blog. BUT the most important rule...is to CREATE AND HAVE FUN! 

If you would like to see a full list of the challenges head over the Core blog HERE for a list that will be updated continually throughout the weekend.


WHO WANTS TO GET CRAFTY?

CHALLENGE: Create a holiday tag using Core'dinations Cardstock. It can relate to Thankgiving, Christmas, Hanukkah, or New Years. Use your imagination and get creative. 

I created a super cute Christmas tag for this challenge. Chocolate Box Core'dinations cardstock was used for the tag base. Is was run through the Big Shot with a candy striped embossing folder. Festive holiday paper was used to create the jar and glitter core'dinations cardstock was used for the jar topper. The final touch to the jar was a Happy Holiday sticker from the David Tutera for Darice Celebrate Car Making System.  For more inspiration using the David Tutera products for your holiday crafting please visit the Holiday How-To page. 


AND one lucky winner will get this awesome pack of Core'dinations Cardstock!  
All images must be loaded by Midnight EST November 10th


I can't wait to see what you create! Thanks for hopping by. make sure to follow me for more crafty inspirations!

Kerri 

Friday, November 1, 2013

Kiwi Lane Designs Blog Hop!


Hey Crafty Friends!

Today I am so excited to be a part of the Kiwi Lane Designs  Blog Hop. I have a really cute, simple, out of the box project for you, I hope you like it!


I know the Kiwi Lane designer templates  are typically used to for scrapbooking and card making. But why not think outside the box and use the templates for other things, like embellishing a jar filled with candy to give as a holiday gift!


Here are the supplies I used to create my gift jar.


Once I got my hands on the Abbie Road template set all I could think of  was they looked like snowy little hills. To decorate my jar I used template 1A to trace and cut out my snowflake patterned paper. 


After I cut it out I inked the edges in Tim Holtz Festive Berries Distress Ink then glued it around the jar. The red checked ribbon was layered on top of the snowflake paper band, the blue snowflake was popped up with foam tape, and the red button and gem were placed in the center. The final touch was red/white twine with jingle bells tied to the jar lid. So cute, so simple, so handmade!

This was my first time working with Kiwi Lane Designs products and I am hooked. I think you will love them too. If you already own a set of templates give this project a try. I think you will love making them and your friends and family will love receiving them.

NOW...... on to some blog hop business. Below is the blog hop list. Please hop a long and comment on all the blogs for a chance to WIN. One random winner will win a $25 gift certificate to the Kiwi Lane shop just for commenting. The winner will be announced on the Kiwi Lane Blog November 7th.

  1. Kiwi Lane http://kiwilane.com/here/blog/
  2. Cristine Redmond http://onescrappynovice.blogspot.com
  3. Joy Nielsen www.threadsnscraps.com
  4. Van Nguyen http://likethecar.blogspot.com
  5. Minousha Bari  http://preservedscraps.blogspot.com
  6. Lissa Mitchell http://mightycrafty.blogspot.com
  7. Arin Flynn http://apieceoflifespie.com
  8. Kerri Smith http://www.crafttimeandcupcakes.com/  <----------- YOU ARE HERE
  9. Christine Meyer http://scrappingwithchristine.blogspot.com
  10. Christina Steel www.tinasscrapcrap.blogspot.com
Thank you so much for hopping by today. Please follow me and check back often for more crafty inspiration.

Have a great crafty day!

Kerri

Wednesday, September 18, 2013

Guest Designer Project for Samantha Walker


Hey Crafty Friends-

I am THRILLED to be guest designer this month for Samantha Walker. Let me introduce myself to all the new friends that may be visiting the blog today. My name is Kerri Smith. My little blog is Craft Time and Cupcakes. I am wife to my retired Air Force husband and mommy to two beautiful princesses, ages 4 and 5. I am a Southern California girl living the Vegas life and I love it! I have always been a creative person. I love every type of craft imaginable. I am a scrapbooker, baker, party planner, and I'm beginning to work more with fabric too. I would say my crafting style is a little bit country, a little bit cutesy, and a lot of fun. I believe projects should be quick, simple, and stunning.  I was so happy working on my project for today.......so let's get to it!

 I'm sure that many of you with a Silhouette love to shop Samantha's cutting files as much as I do. For today's project I decided to do something that sticks with the theme of my blog.......A cupcake box!

I used the Cupcake Scalloped Box cutting file. I cut the pieces from craft cardstock and a blue and red floral cardstock.


I folded all of the perforated lines then glued the tab of the craft cardstock piece to the floral cardstock to merge the top and bottom of the box together. I then glued all the remaining tabs to complete the box.


Once it was all together I jazzed things up a bit by inking up the edges using Tim Holtz Distress Ink in Festive Berries.


I then placed the circle insert inside the box and added my yummy cupcake.


The final touch to my project was a red gingham ribbon tied around the box to hold it all together.


I couldn't be happier with how this project turned out. The file was so easy to cut and put together. I can see making these boxes for every holiday, teachers gifts, birthday parties. They will put a smile on any one's face when they receive this special little gift.

I want to say a special thank you to Samantha Walker Designs for letting me guest design this month. For more inspiration please follow my blog at http://www.crafttimeandcupcakes.com/. You can also follow me on Pinterest and Facebook.

Have a great crafty day!

Kerri